
For a more technical description of HPLIP see HPLIP open source site.
Getting it on paper
© 2010-2013 Dennis Leeuw dleeuw at made-it dot com
With a big THANKS to Eric Toirkens for his help with the Windows section.
License: GPLv2 or later
Printing has always been the worst nightmare of system administration, especially in a mixed environment. Most printers use their own technique to create dots on paper (the raster-image). Printers also have their own special features, like being able to print double-sided, color managent, etc. On the other side of the spectrum we have computers handling graphics, text and what have you in their own special way (GDI, Display PostScript, Quartz, X-server), and somehow we want to connect the two in a universal way.
That universal way is provided by CUPS. CUPS is a system created around PostScript and IPP. PostScript is the formatting language for the job and IPP gives you the ability to query printers and jobs about their capabilities and their status. Creating a printserver with CUPS should have solved the printing problem forever, if everybody spoke IPP and PostScript.
Modern GNU/Linux and Mac OS X use CUPS to do their printing, they both speak PostScript and IPP. Windows XP knows about HTTP printing, something IPP printing, and Microsoft has a PostScript driver. So you can sent a PostScript job to a printer, but Microsoft Windows still wants to have a local printer driver which does the local formatting. This means that for Windows we are still stuck with local drivers. But thanks to PostScript, PPDs and CUPS we can make the Printer Driver Hell a little better, read on...
I will start with some definitions and descriptions, with which I hope to give you a better idea of what is happening, with the risk of boring you.
A PDL is a Page Description Language. A PDL is a higher level language in which to describe a page layout that can be processed by a printer that understands that language to be converted to a raster image that can be handled by the electronics inside the printer.
Examples of well known PDLs are: PostScript from Adobe and PCL from HP. For a more extensive list see wikipedia.
PostScript is a graphical programming language which gives you the ability to describe a complete page. If you have a PostScript enabled printer you can sent a PostScript file directly to that printer. Inside the printer there is an interpreter that converts the PostScript to a raster image that is printed by the printer. The interpreter is called a RIP (Raster Imaging Process).
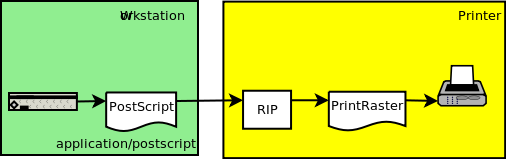
PostScript is a language designed by Adobe, but the specification is open so a lot of printer manufacturers implemented it in their printers.
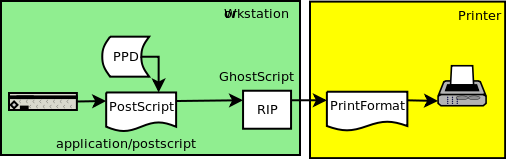
The RIP can of course also be a piece of software running on a computer instead of a printer. If you installed GhostScript on your computer, you are installing the PostScript RIP in an open source way. It is a software RIP that outputs a raster image for a certain device (printer), based on PostScript input.
To give you an idea what PostScript looks like:
%!PS
12 3 mul
/Times-Roman findfont   % Get the basic font
20 scalefont            % Scale the font to 20 points
setfont                 % Make it the current font

% Write some text
newpath                 % Start a new path
			% Note that we count from the bottom of the page
			% So 0 is at the bottom and 450 is high up
30 450 moveto           % Lower left corner of text at (30, 450)
(Hello, world!) show    % Typeset "Hello, world!"

% now do a box above the text
30 480 moveto		% reposition at 30 480
0 50 rlineto		% relative line 0 units to the right and 50 to the top
50 0 rlineto		% go 50 to the right
0 -50 rlineto		% now 50 down
closepath		% close the path
.7 setgray		% switch to 70% gray scale
fill			% fill the box

% Create the output
showpage
If you feed this to gv, the GhostScript Viewer, you will see what a printed version of this code looks like.
A PPD or PostScript Printer Description is a document that "enhances" a PostScript document with printer specific settings. The document describes the options that a printer supports and the settings that belong to these options. By selecting an option the needed additional PostScript code is added to the PostScript document that is sent to the printer.
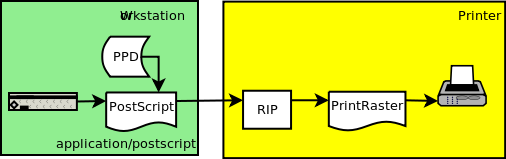
A piece of PPD file could look like this:
*%====================================
*%         Fit to Page
*%====================================
*OpenUI *HPPaperPolicy/Fit to Page: PickOne
*OrderDependency: 10 AnySetup *HPPaperPolicy
*DefaultHPPaperPolicy: NearestSizeAdjust
*HPPaperPolicy PromptUser/Prompt User: "
   <</DeferredMediaSelection true>> setpagedevice"
*End
*HPPaperPolicy NearestSizeAdjust/Nearest Size and Scale: "
   <</DeferredMediaSelection false>> setpagedevice
   <</Policies << /DeferredMediaSelection true /PageSize 3 >>>> setpagedevice"
*End
*HPPaperPolicy NearestSizeNoAdjust/Nearest Size and Crop: "
   <</DeferredMediaSelection false>> setpagedevice
   <</Policies << /DeferredMediaSelection true /PageSize 5 >> >> setpagedevice"
*End
*?HPPaperPolicy: "(PromptUser) = flush"
*CloseUI: *HPPaperPolicy
The PPD options should be presented to the user as options. The user can then select things like papersize, resolution, to which tray to print, etc. The code for the selected options will be added to the print job (the PostScript document). The new document is still a PostScript file, but, most of the times, a very device dependent PostScript file. This file can not be sent to any printer, but only to the printer where the input from the PPD makes sense.
Since GhostScript is a RIP, as we saw in a previous section, it is possible to create output for non-PostScript printers. The input however should always be PostScript or PDF. To learn more about the capabilities use:
gs -hYou will see that the input formats (al least on my system) can be anything of PostScript, PostScriptLevel1, PostScriptLevel2, PostScriptLevel3 or PDF. The output created by GhostScript can be in a large number of formats. Since it is a RIP and the I stands for image, we take our previous PostScript document and saved it as test.ps. By using:
gs -dBATCH -sDEVICE=png256 -sOutputFile=test.png test.pswe converted the PostScript file to an image file called test.png.
If we had a printer that did know how to handle PNG files we could sent the image to that printer.
Essential for us is that our installed version of GhostScript supports the CUPS device. It is this device that is used to print to non-PostScript printers. So check to see if cups is present in the "Available devices" list.
When printing jobs especially when you share a printer, there are sometimes more jobs then can be printed at the same time, meaning that jobs have to be placed in a queue. Historically the software responsible for placing the jobs in the queue is called the spooler. The spooler monitors the queue and the printer. When the printer is free the next job is sent to the printer.
Jobs in the queue can be placed on hold, deleted or moved to another position in the queue. All this maintenance on the queue can be done through an IPP connection.
IPP stands for Internet Printing Protocol. It is an HTTP based protocol to send print jobs to printers using IANA port 631. The printers are addressed by URIs like ipp://printserver.your.domain:631/printers/my_printer.
IPP is also the protocol that can be used to tell the client what capabilities a printer has and thus what configuration options to support. The client can also use IPP to control the print job. The client could e.g. use IPP to place the job on hold, or even cancel it.
CUPS is a complex system of filters that creates an output suitable to be transfered to a printer. It takes as it's input PostScript. It acts as a print server and receives its control commands through IPP.
CUPS can be used as simple printserver where it accepts a preformated job and passes it on to the printer and only acts as a spooler, or it can accept the job as a PostScript file and do all the filtering on the server. You can decide per printer what CUPS functionality should be.
If you configure your CUPS printers with a Model/Driver of RAW it means that CUPS will not process the job, but only does store and forward. Making the job printer ready should thus be done on the client, meaning that every client should have a driver for the printer. When you update the driver, or worse you replace the printer, you should replace the driver on all your clients.
You could also configure CUPS printers with a Model/Driver specific for the printer that it is printing to. This means that CUPS expects a PostScript file as input, and that CUPS will do the processing to make the job ready for the printer. It is this last situation that we will describe.

For the entire system to work as described in this document we need GhostScript version 7.05 of higher on the print server. To check the version installed use:
gs --versionThe minimal CUPS version needed is 1.1.15
# Red Hat based systems:
rpm -q cups
# Debian based systems:
dpkg -l cups
After the CUPS installation we are going to adjust the /etc/cups/cupsd.conf file. The important parts to change are:
Listen localhost:631
Listen 111.222.333.444:631
Listen /var/run/cups/cups.sock
<Location />
  allow 111.222.0.0/16
  Order allow,deny
</Location>
# Restrict access to the admin pages...
<Location /admin>
  allow 111.222.555.0/24
  Order allow,deny
</Location>
In the above image you see at the bottom the different MIME types used by CUPS. CUPS uses its own MIME type definitions defined in the /etc/cups/mime.types file. These MIME types are used by the conversion an filtering process. When a job comes in CUPS reads from /etc/cups/ the *.convs files to determine how to handle a certain file type. Now let us assume we have a file called pdf.convs with the following content:
application/pdf application/postscript 33 pdftopsThis means that when a file with MIME-type application/pdf comes in it can be converted to application/postscript by using pdftops at a cost of 33. These costs are virtual and are used to determine the least expensive path through the filtering process.
If CUPS doesn't know how to handle a file, meaning there is no entry in the mime.types file or no entry in a file *.types, the document is given MIME type application/octet-stream and CUPS will refuse to print it. In your logs you will read a line like:
Unable to handle file 0 to printable format for jobThis will happen when you print from a Windows clients using a local Windows driver. By creating two files you could solve the problem. The first file is raw.cons and should contain:
application/octet-streamand the second file raw.types should contain:
application/octet-stream application/vnd.cups-raw 0Now CUPS knows how to handle these files, it won't do any filtering since the output file is alread considered of type vnd.cups-raw and is directly sent to the printer. This solution still means that you need the specific drivers to be installed on your Windows clients, which we said we would not do.
As you have seen in the above CUPS is able to do some conversion from non-PostScript input to PostScript. In the /usr/lib/cups/filter/ you'll find the filter for pre- and post-filtering. It is only from the mentioned filters in this directory that CUPS can filter from non-PostScript to PostScript. A well known conversion that is done through pre-filtering is with images. Images are directly converted to a raster format by using imagetoraster
From the PPD file CUPS tells the Workstation through IPP what the options of a certain printer are and the Workstation sends the PostScript job including the selected options to CUPS. CUPS uses a wrapper script around GhostScript to create a PostScript file that includes the PPD code needed for the options selected.
If the final destination is a PostScript printer the file is sent to the Backend.
If the final destination is not a PostScript printer then the file including the code from the PPD is again run through a filter that creates a CUPS-Raster file. This is a device independent raster format that can be used to convert it to a file format that is supported by the printer.
It is here that the -sDEVICE=cups is used with GhostScript.
The last conversion step is to translate the CUPS-Raster image to something the printer will actually understand. The outcome can be PCL, ESC/P, Dymo or any other PDL supported by the printer.
Also HPLIP picks it up from here, for the HP printers:
For a more technical description of HPLIP see HPLIP open source site.
When you use HPLIP for printing to your HP printer (and you want that!), read:
The last thing that CUPS does is to transfer the file to the printer to handle the job. The Backend can be anything; a USB attached printer or a networked printer that uses IPP. CUPS supports a lot of different backends:
The different backend drivers supported by your system can be found in /usr/lib/cups/backend.
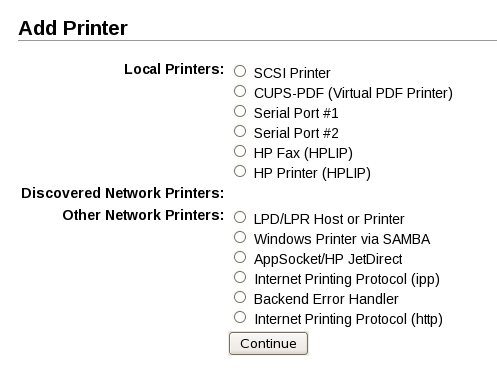

When you use HPLIP for HP printers, even though the printer might be a network printer, select Local Printers: HP Printer (HPLIP)
To make the HPLIP-driver work make sure SNMP is turned on on your HP Printers.
Run: hp-makeuri 66.35.250.209 replacing 66.35.250.209 with the IP address of your printer. To obtain the URI to be used in CUPS. For these printers select when adding a printer the Local Printers HP Printer (HPLIP) option (see the next chapter for the screen shots).
If hp-makeuri reports error: Device not found you have to use another protocol to connect to the printer, like AppSocket/HP JetDirect or IPP.
Both IPP and LPR provide, next to the print job document, a print job control file. This control file contains additional, and overlapping, information, about the to be printed document. For LPR this additional file is called the control file, while for IPP it is called the attributes file.
On CUPS this control file is stored in /var/spool/cups where the file starts with a c and then a number. These files contain binary data, so the fields are readable, but the contents is more difficult to figure out.
Some printers take the settings in the control file as authoritive, some (most) printers think the data within the job as the basis to act on. Especially the amount of copies can sometimes create confusion, when the control file and the job say different things. The control file contains a setting called copies, and the PostScript-document contains a line with NumCopies.
Using hexdump -C d149000, where c149000 is the controle file belonging to my job d149000, reported:
--------  -- -- c  o  p  i  e  s     |1| |    2    |
000000f0  00 06 63 6f 70 69 65 73  00 04 00 00 00 02 21 00  |..copies......#.|
Field 1 (04), tells the length of the next field, meaning that 00 00 00 02 is the amount of copies that are requested.
Printing through port 9100, the so called JetDirect or AppSocket printing, is a store and forward protocol. It assumes that the data provided contains the job to be printed and everything that is related to it. It does not process the job, and is thus ideal for printing from Microsoft Windows.
The PPD files used by CUPS can be the same PPDs as used on Windows systems (meaning you can extract the PPD for CUPS from the Windows driver package). CUPS even uses PPD files for non-PostScript printers so there is a uniform interface to describe a printer. With some extra options in the PPD file the CUPS-PPD file tells the system which type of output needs to be generated.
For PostScript printers the PPD files can be used as supplied with the Windows drivers, for non-PostScript printers you can get the PPD files from:
Most distro's already support these projects and you can install the PPDs and drivers through the distro package manager.
To test a certain PPD for compliance with CUPS go to: http://www.cups.org/testppd.php or use cupstestppd on your local machine.
WARNING: don't use a PPD from a PostScript capable version of a printer for a non-PostScript enabled version of the same printer. This will most likely NOT work.
To add PPD files to your CUPS system do the following:
mkdir /usr/share/cups/model/Xerox
cp ~/Xerox/*.ppd /usr/share/cups/model/Xerox/
A restart or reload of CUPS is not needed the driver is picked up automatically.
Configure the default settings for the printer and test that the printer works. Do this by selecting from the Printers tab your printer and select the Set Default Options option:
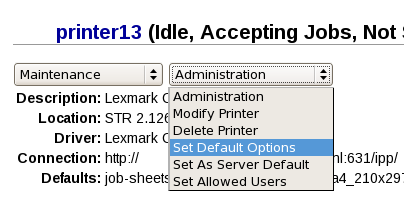
Under the Maintenance list you can find the Print Test Page option.
Before you print to a printer from a client it is important that the CUPS part is working as described above and that you can print from CUPS to your printer; print a test page!
Since our print server is a CUPS server and GNU/Linux natively supports CUPS, the easiest way is to tell the workstation which CUPS server to use as a print server. Adjust the cupsd.conf file on your workstation, so that the printers are retreived from the print server:
# How we deal with advertised print servers
Browsing On
BrowseOrder allow,deny
# Connect to our own CUPS server
BrowsePoll printserver.your.domain:631
BrowseRemoteProtocols CUPS
# Turn off everything from BrowseAllow and Protocols etc.
stop cups, remove /var/cache/cups/remote.cache and start cups. Every application using the CUPS server should now be able to print to the printers defined on the print server.
If you want to start with a clean system go to System Preferences, select Printing and right click with the mouse in the printers list. If you select reset printing system all local and remote printers will be wiped from the system.
NOTE: The following procedure works up to Mac OS X 10.7, from then on one has to use DNS-SD, read on for more information.
On the client you only have to tell the local print system (CUPS) where the print server is. You can do this by manually editing the /etc/cups/cupsd.conf and restart the server or by using the webinterface on http://127.0.0.1:631/ in the Administation section select the Edit Configuration File button. In both cases you should add the BrowsePoll line and change the BrowseRemoteProtocols and BrowseLocalProtocols lines like this:
BrowseRemoteProtocols CUPS
BrowseLocalProcolols CUPS
BrowsePoll printserver.your.domain
restart cups and you are done. Every application using the CUPS server should now be able to print.
In this example configuration we use example.com as our domain. The printserver is called printserver.example.com and is known as 192.168.1.55 on our server network. The printer is known as printer102.example.com and can be reached at 192.168.10.2.
First we add the standard A-record settings so DNS works as should be (the ORIGIN and TTL settings are just their for clarity, and testing purposes):
$ORIGIN example.com
$TTL 3600 ; 1 hour
printserver          A  192.168.1.55
printer102           A  192.168.10.2
Next we add a PTR record for our IPP capable printer, or better it is a printer connected to a CUPS server that provides IPP printing to our users:
_ipp._tcp PTR printer102._ipp._tcp.example.com.This feature tells a client that IPP (port 631) over TCP is provided by a printer called printer102._ipp._tcp.example.com..
Other printing related services are _printer._tcp which is standard LPR (port 515) printing and _pdl-datastream._tcp used for socket printing (port 9100). List of PDLs (page description languages) supported by a given printer is indicated by the "pdl" key in the TXT record. And there is also something called an HTTP printer with a service type of _printer._sub._http._tcp FIXME is this correct?.
For a complete list of Service Types supported by DNS-SD see: http://www.dns-sd.org/ServiceTypes.html.
_cups._sub._ipp.tcp PTR printer102._ipp._tcp.example.com.FIXME I can not find any information for this line. My idea is that it tells the client that there is a CUPS service... but does the client care? It seems like Mac OS X 10.8 machines do care...???
The following line enables AirPrint, an Apple feature for iOS based products like the iPad and the iPhone. This way these devices can find our printers.
_universal._sub._ipp.tcp PTR printer102._ipp._tcp.example.com.FIXME: but what are the details that a client expects, when searching for AirPrint services?
Now that we told our clients that our printer can do IPP, AirPrint and that it is a CUPS printer, we need to tell the client where the printer is located and we do this by using a SRV record:
printer102._ipp._tcp SRV 0 0 631 printserver.example.com.This tells the client that our IPP printer can be reached at printserver.example.com on port 631.
And finaly there is a TXT record for printers. Within a TXT record additional information is provided concerning the printer.
printer102._ipp._tcp TXT (
			   "txtvers=1"
			   "qtotal=1"
			   "rp=printers/printer102"
			   "adminurl=ipp://printserver.examle.com:631/printers/printer102"
			   "product=(Xerox WorkCentre 7556)"
			   "note=Room.120"
			   "ty=Xerox WorkCentre 7556"
			   "pdl=application/postscript"
                           "Priority=50"
                           "Transparent=F"
                           "Binary=F"
                           "TBCP=F"
			  )
I kept it simple. The printer can be found on the printserver, and I only added the most essential (required) parts:
The following table provides an overview of the records that can be supplied in the TXT field and the documents that define them (IPPE for cs-ippeve10-20130128-5100.14.pdf, BONJ for Bonjour Printing 1.0.2).
If a field name is printed in bold it means that the item is a required field, the bold in the value column is the default value. Note that in the BONJ documentation is mentioned that values for a printer that are identical to the default value SHOULD NOT be present in the TXT record.
| TXT field | PPD field | Value | Document | Description |
|---|---|---|---|---|
| adminurl | - | empty string | BONJ/IPPE | The configuration page URL for the printer as reported by the "printer-more-info" Printer Description attribute. The domain part of the URL should be identical to the target host in the SRV record. For our CUPS printserver it points to the server. |
| air | - | none | IPPE | The type of authentication information that is required for the printer |
| binary | - | T/F | BONJ | Does the printer accept character codes 80-FF? |
| Bind | - | T/F/U | BONJ/IPPE | Can the printer bind output? |
| Collate | Collate | T/F/U | BONJ/IPPE | Can the printer collate copies? See also Sort |
| Color | ColorDevice | T/F/U | BONJ/IPPE | Can the print do color-printing? |
| Copies | - | T/F/U | BONJ/IPPE | Can the printer make copies on its own? |
| Duplex | Duplex | T/F/U | BONJ/IPPE | Does the printer support duplex printing? |
| DUUID | - | empty string | IPPE | he UUID of the Device without the "urn:uuid:" prefix as reported by the "device - uuid" Printer Description attribute. See also UUID |
| Note | - | empty string | BONJ/IPPE | The location of the Printer as reported by the "printer-location" Printer Description attribute |
| PaperCustom | MaxMediaWidth, MaxMediaHeight, CustomPageSize True: | T/F/U | BONJ/IPPE | Does the printer support custom sizes |
| PaperMax | PaperDimension | legal-A4 | BONJ/IPPE | The maximum media size supported by the Printer |
| pdl | - | empty string | BONJ/IPPE | comma-delimited list of supported MIME types, if not present the default pdl=application/postscript is assumed. |
| Priority | - | 0-99 (50) | BONJ/IPPE | The priority for the service where 0 is the highest priority and 99 is the lowest priority. |
| Product | Product (can be multiple fields in the PPD) | empty string | BONJ/IPPE | The PostScript product name as stored in the PPD file of CUPS with the parenthesis, (MFG MDL), where MFG is the manufacturer name and MDL is the model name. See also ty |
| Punch | - | T/F/U | BONJ/IPPE | Can the printer punch output? |
| qtotal | - | 1 | BONJ/IPPE | Number of queues for this printer, and thus the total number of TXT records for this printer. |
| rp | - | empty string | BONJ/IPPE | The remote print queue name, which is the resource path portion of the Printer URI without the leading slash. For port 9100 printers this key SHOULD NOT be present |
| Sort | - | T/F/U | BONJ/IPPE | Can the printer sort output? |
| staple | - | T/F | IPPE | Can the printer do stapling? |
| TBCP | Protocols | T/F | BONJ | Is the printer capable of accepting Tagged Binary Communication Protocol? |
| TLS | - | none | IPPE | Maximum TLS version supported |
| Transparent | MediaType | T/F | BONJ | Is the printer capable of of accepting character codes 00-1F |
| txtvers | - | 1 | BONJ/IPPE | Major Bonjour version, MUST be 1. SHOULD be first key/value pair in TXT record. |
| ty | Model | empty string | BONJ/IPPE | The make and model of the printer as reported by the "printer-make-and-model" Printer Description attribute. See also Product |
| usb_CMD | - | empty string | IPPE | The IEEE 1284 Device ID command set value. |
| usb_MDL | - | empty string | BONJ/IPPE | The IEEE 1284 Device ID model value. |
| usb_MFG | - | empty string | BONJ/IPPE | The IEEE 1284 Device ID manufacturer value. |
| UUID | - | empty string | IPPE | The UUID of the Printer without the 'urn:uuid:' prefix as reported by the "printer-uuid" Printer Description attribute. |
With everything in place one can go to the System Preferences, select Printers and Faxes, click on the + sign, and select the printer. This will automatically install the driver, and everything works as expected.
Mac OS X 10.8.2 and up has a "bug" in the printer configuration system. Please do not use the Print & Scan preferences pane, this will create a PostScript printer with a Generic Postscript Driver, and prevents you from selecting all the printer options of a printer. To add a printer start TextEdit:
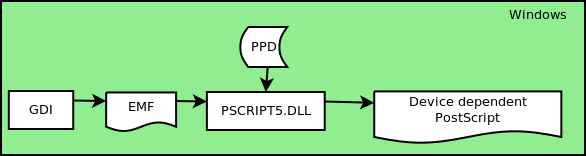
The Windows display engine is called GDI (Graphics Device Interface). GDI is a unified interface for applications to draw pictures, use fonts and documents, on screen and on the printer. To send a file to a printer a so called EMF (Enhanced MetaFile) is created. This EMF file is handled by the print driver to create a file that can be handled by the printer.
A Microsoft print server will always handle raw files, it will not filter the job, only store and forward it. All processing is done on the client.
To make Windows work with CUPS we make Windows think it is doing the processing by telling it that every printer in the world is a PostScript printer and we provide it with the right PPD to do so. This PostScript job is then sent to CUPS where CUPS handles the job and makes sure the job is translated to a job the printer understands.
To speed up the processing of the PPD file, a BPD file is created. The BPD file is a binary interpretation of the PPD file used by the driver so that it doesn't need to parse the PPD file every time the driver is invoked. Everytime you start a printing process, without the BPD file present a new BPD file is created.
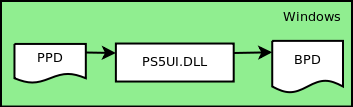
When you update the PPD make sure the BPD is recreated.
The Microsoft PostScript driver consists of the following files:
ps5ui.dll reads the BPD, or the PPD if the BPD does not exist. It gathers the menu code from the PPD and presents the user with the available printer options.
To manualy install a PPD for a printer it is assumed that the default PostScript drivers for Windows are installed on the system. This means that the drivers MS Publisher Color Printer or MS Publisher Imagesetter should be present.
[Version]
Signature="$Windows NT$"	; NT based systems, "$CHICAGO$" is for cross plaform
Provider=%INF_Provider%		; See [strings] section for variables
Class=Printer
ClassGuid={4D36E979-E325-11CE-BFC1-08002BE10318}
DriverVer=02/06/2013		; Note this is mm/dd/yyyy

[Manufacturer]
"Made IT Driver Section"        ; Just a name :)

[Made IT Driver Section]
"%DRV_Modelname%"="PPD Install", HWID

; This is our PS printer per architecture
[PPD Install.NTx86]
DataFile=%DRV_PPD%
CopyFiles=@%DRV_PPD%
Include=NTPRINT.INF             ; Collection of MS known drivers
Needs=PSCRIPT.OEM,PSCRIPT_DATA  ; From NTPRINT.INF: Copy MS PS Driver files
DataSection=PSCRIPT_DATA        ; From NTPRINT.INF: Sets DriverFile, ConfigFile and HelpFile

[PPD Install.NTamd64]
DataFile=%DRV_PPD%
CopyFiles=@%DRV_PPD%
Include=NTPRINT.INF
Needs=PSCRIPT.OEM,PSCRIPT_DATA
DataSection=PSCRIPT_DATA

[PPD Install.NTia64]
DataFile=%DRV_PPD%
CopyFiles=@%DRV_PPD%
Include=NTPRINT.INF
Needs=PSCRIPT.OEM,PSCRIPT_DATA
DataSection=PSCRIPT_DATA

[DestinationDirs]
DefaultDestDir=66000

[ControlFlags]
ExcludeFromSelect = 2369

[Strings]
INF_Provider="DAS Project"
DRV_Modelname="Xerox WC7556"
DRV_PPD="WC7556.PPD"

; End of file
For more information about writing INF files see the following Microsoft documentation:
Microsoft Windows always needs a local driver to handle printing. With our setup we are going to provide that. We will give Windows a PostScript driver, the CUPS driver extension and a PPD tailored for the printer. To be able to tell Windows which driver to use with which printer we need SAMBA. So we are first gonna extend our printserver with SAMBA.
The only thing that SAMBA needs to do for us is to act as a print server and a provider of printer drivers, so we can create a simple configuration like this:
[global]
   load printers = yes
   printing = cups
   printcap name = cups

   # Only permit hosts in our network to connect
   hosts allow = 192.168.

   # Access from non-authenticated users, like guests
   map to guest = Bad User

[printers]
   comment = All Printers
   path = /var/spool/samba
   browseable = no
   guest ok = yes
   writable = no
   printable = yes
   printer admin = root, @ntadmins

[print$]
    comment = Printer Drivers
    path = /srv/samba/printer-drivers
    public = no
    guest ok = yes
    browseable = yes
    read only = yes
    write list = root, @ntadmins
Add root to the SAMBA password database:
smbpasswd -a root
Before we can install a driver on Windows we need to collect the different parts. We are going to use an in between Linux station where we collect all the different drivers, and from this system we put the drivers on the print server.
For the CUPS specifics we use the CUPS Windows PostScript driver extension available from the CUPS site. From the download section I used cups-windows-6.0-1.i386.rpm. This is not an essential part and could be skipped. If skipped also skip later on the cups6* puts.
Make a temporary directory on your in between system called PostScriptDrivers and cd into this directory. On Debian systems you need to install rpm so you have the ability to use rpm2cpio.
rpm2cpio path/to/cups-windows-6.0-1.i386.rpm > cups-windows.cpio
cpio -id < cups-windows.cpio
cp usr/share/cups/drivers/* .
Next we need a Windows driver that is capable of handling PostScript. We need to get these from a already available Windows machine. To list the drivers on a Windows machine run:
rpcclient -U'MACHINE\administrator%password' -c 'enumdrivers 1' <IP-of-machine>the one can be replaced by 2 or 3 for more details. The driver we are looking for is MS Publisher Color Printer or MS Publisher Imagesetter. If you have found a machine that has one of these drivers installed use the following command to retreive the files (assuming that you are still in you PostScript directory:
smbclient //<IP-of-machine>/print$ -N -U "MACHINE/administrator%password" \
   -c "lcd .; get ps5ui.dll; get pscript5.dll; get pscript.hlp; get pscript.ntf;"
To install them on the print server we need to copy the files to the print server in the W32X86 directory:
smbclient //printserver.your.domain/print$ -N -U "MYDOMAIN/root%secretrootpassword" \
   -c "mkdir W32X86; cd W32X86; lcd .; put cups6.inf; put cups6.ini; put cupsps6.dll; put cupsui6.dll; put ps5ui.dll; put pscript5.dll; put pscript.hlp; put pscript.ntf;"
smbclient //printserver.your.domain/print$ -N -U "MYDOMAIN/root%secretrootpassword" -c "cd W32X86; lcd /etc/cups/ppd/; put <printer-file.ppd>"If the CUPS and SAMBA server are one and the same machine MYDOMAIN/ can be stripped from the above and following commands
rpcclient printserver.your.domain -N -U "MYDOMAIN/root%secretrootpassword" \
   -c "adddriver \"Windows NT x86\" \"<cups-printer-name>:pscript5.dll:<printer-file.ppd>:ps5ui.dll:pscript.hlp:NULL:RAW:ps5ui.dll,pscript5.dll,pscript.hlp,pscript.ntf,<printer-file.ppd>,cups6.inf,cups6.ini,cupsps6.dll,cupsui6.dll\""
The <cups-printer-name> is the name you give to the driver. I chose to use the printer name as the driver name, just for scripting and overview convenience, but you could use any name you like.
NOTE: if you get a message saying: result was WERR_INVALID_PARAM, restart smbd and try again. Also check the MYDOMAIN/ part, maybe remove it from the commands?
rpcclient printserver.your.domain -N -U "MYDOMAIN/root%secretrootpassword" -c "setdriver \"<cups-printer-name>\" \"<cups-printer-name>\""Within this command the first reference of <cups-printer-name> is the CUPS name from the Name field when you created the printer. The second reference is the name of the driver you choose in point 2.
Changing printer settings is a bit of black magic when using Windows, but we will try to describe what is going on. More reference documentation can be found at:
There are three parts that determine the settings, the PPD on the SAMBA server, the Printing Defaults as configured by the Administrator on SAMBA, the settings set by the user in the Printing Preferences and also we have the Properties menu entry.
The majority of default settings for a printer can be set via CUPS in the web interface with the Set Default Options entry. The PPD file on the client only seems to be there to satisfy the driver. This one does not seem to be used by the Windows system. If you however throw it away, the printer is not available anymore, so do not touch the local PPD file.
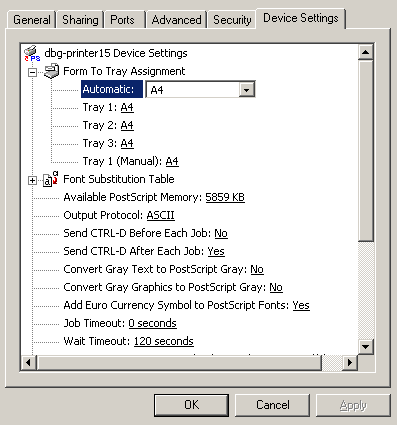
After you have made a change in the CUPS web interface you have to rerun steps 3 and 4 from the previous section. The changes you made are visible through the printer Device Settings tab in the printer properties menu:
Some default settings can not be changed through the PPD file, like setting the Paper Size. To change these defaults run:
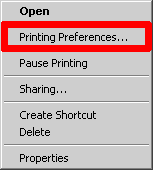
runas /netonly /user:<printserver>\root "rundll32 printui.dll,PrintUIEntry /p /t3 /n\\<printserver>\<cups-printer-name>"use the Printing Preferences entry when you right click on the printer:
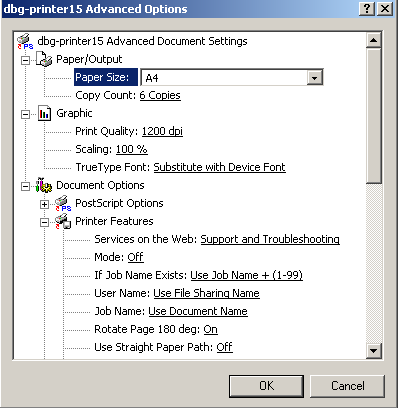
 From the Advanced tab, select Printing Defaults. Settings you change here are stored in the /var/lib/samba/ntprinters.tdb file on the SAMBA server and are used as defaults for all users using the printer. These settings overrule the PPD. Via the Advanced... button you can select even more settings, like Paper Size and Copy Count.
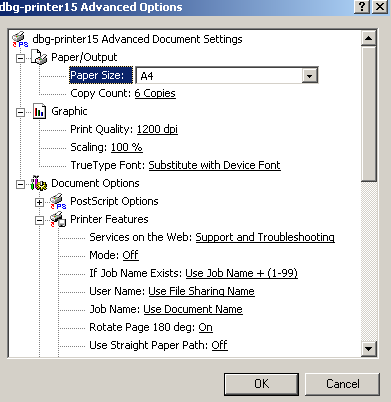
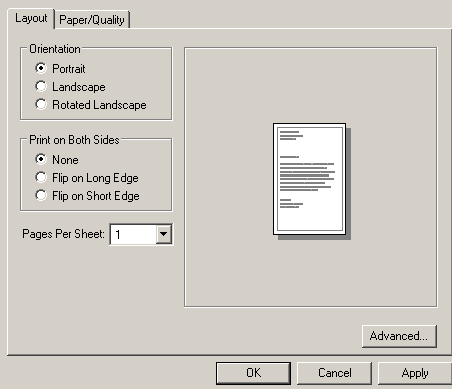
Settings changed by the user are stored in the Registry. The PPD nor the ntprinters.tdb are not altered. A user can use the normal procedure for changing the printer properties, by using the printer Propeties pane and selecting Printing Preferences:
With simple VB-script you could also connect the printer. You should substitute printserver.your.domain with your printserver name or IP address and cups-printer-name with the shared printer name.
Set WshNetwork = WScript.CreateObject("WScript.Network")
WshNetwork.AddWindowsPrinterConnection("\\printserver.your.domain\cups-printer-name")
If you like to set a new printer on the place of an old one and maintain the naming scheme (Although we advise against this. It is better to use an entirely new name.). You first need to replace the CUPS PPD with a new one, then on Windows you need to delete the old driver and reconnect the printer. This will hopefully get you a new printer driver.
First remove the printer from CUPS. Then remove the printer from SAMBA using the deldriverex command:
rpcclient -N -U 'MYDOMAIN/root%secretrootpassword' -c 'deldriverex printername "Windows NT x86" 3' printserver.your.domainNote that this is the printer name, en NIET de naam van de driver!
Maybe a restart of SAMBA after the delete in CUPS is alse enough. Needs more tests!
If enumprinters still shows the printer then restart SAMBA.
Then delete the driver:
rpcclient -N -U 'MYDOMAIN/root%secretrootpassword' -c 'deldriver "Windows CUPS Driver"' printserver.your.domainor
rpcclient -N -U 'MYDOMAIN/root%secretrootpassword' -c 'deldriverex "Windows CUPS Driver" "Windows NT x86" 3' printserver.your.domainignore the WERR_UNKNOWN_PRINTER_DRIVER message, if you get one.
If enumprinters or enumdrivers still shows the printer then restart SAMBA.
Note that despite the help description for deldriverex it does not delete the files from your system, so you still have to manually remove the files.
Which printers does CUPS have:
lpstat -p -dPrint via CUPS:
lpr -P <cups-printer-name> <preformatted-file>Print directly to printer:
rlpr -H <printer-address> <preformatted-file>